> ## Documentation Index
> Fetch the complete documentation index at: https://docs.artaios.ai/llms.txt
> Use this file to discover all available pages before exploring further.
# Settings
> Manage API keys and OAuth integrations
The Settings page is where you manage API keys for accessing agents and configure OAuth integrations for toolkits.
## Settings Sections
### API Keys
 API Keys let external applications access your agents.
#### Creating an API Key
Go to **Settings** → **API Keys**
Opens the key creation dialog
Choose when the key should expire (for security)
**Important**: Copy the key immediately. You won't see it again!
API keys have full access to your account. Anyone with the key can execute agents, access knowledge bases, and manage configurations.
Store API keys securely. They grant full access to your account.
#### Using API Keys
Include the API key in your requests:
```bash theme={null}
curl -X POST https://amas.artaios.com/api/amas/conversations/execute \
-H "Authorization: Bearer YOUR_API_KEY" \
-H "Content-Type: application/json" \
-d '{
"agent_id": "your-agent-id",
"message": "Hello!"
}'
```
#### Managing Keys
* **Rotate regularly**: Create new keys and delete old ones every few months
* **Monitor usage**: Check API key usage in the dashboard
* **Revoke immediately**: If a key is compromised, delete it right away
You can only have one valid API key at a time. Creating a new key will invalidate the previous one.
### Integrations
Manage OAuth integrations for toolkits (Microsoft Outlook, Teams, etc.).
API Keys let external applications access your agents.
#### Creating an API Key
Go to **Settings** → **API Keys**
Opens the key creation dialog
Choose when the key should expire (for security)
**Important**: Copy the key immediately. You won't see it again!
API keys have full access to your account. Anyone with the key can execute agents, access knowledge bases, and manage configurations.
Store API keys securely. They grant full access to your account.
#### Using API Keys
Include the API key in your requests:
```bash theme={null}
curl -X POST https://amas.artaios.com/api/amas/conversations/execute \
-H "Authorization: Bearer YOUR_API_KEY" \
-H "Content-Type: application/json" \
-d '{
"agent_id": "your-agent-id",
"message": "Hello!"
}'
```
#### Managing Keys
* **Rotate regularly**: Create new keys and delete old ones every few months
* **Monitor usage**: Check API key usage in the dashboard
* **Revoke immediately**: If a key is compromised, delete it right away
You can only have one valid API key at a time. Creating a new key will invalidate the previous one.
### Integrations
Manage OAuth integrations for toolkits (Microsoft Outlook, Teams, etc.).
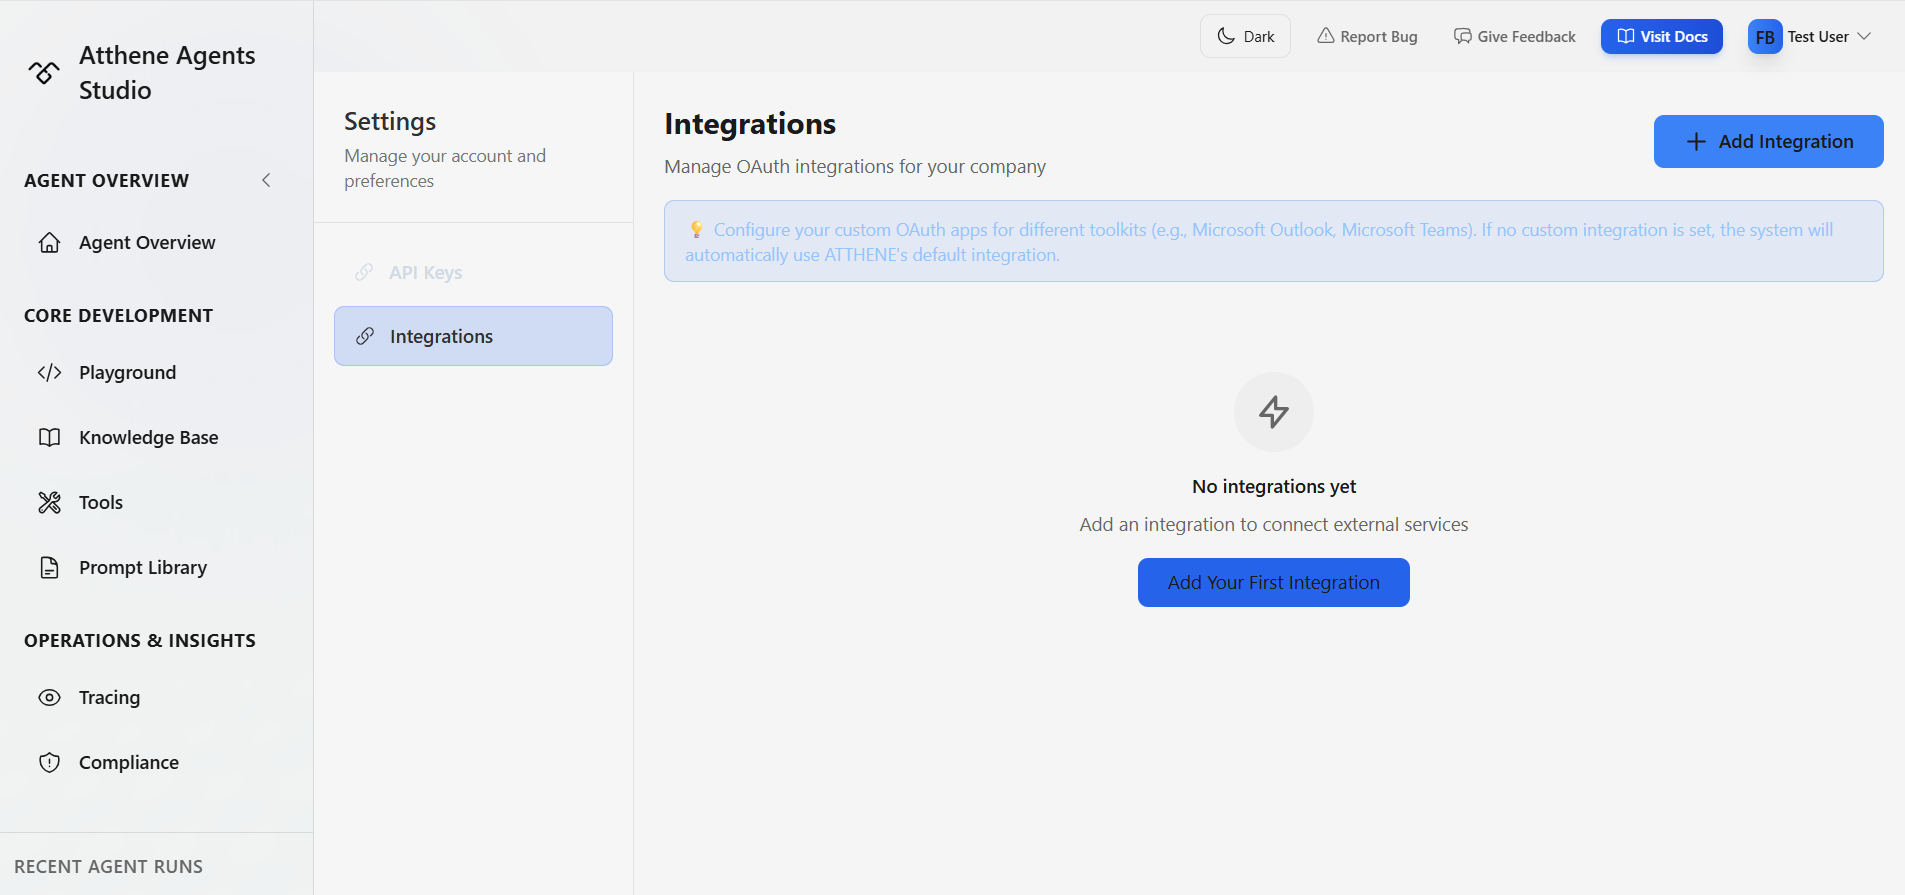 #### How Integrations Work
Integrations control how users authenticate with external services (like Microsoft Outlook or Teams) when using toolkits.
**ARTAIOS's Default Integration**: If you don't configure a custom integration, ARTAIOS provides a pre-configured OAuth app that works immediately. When users authorize a toolkit connection, they'll use ARTAIOS's app by default.
**Custom Integration**: You can add your own OAuth app credentials (Client ID & Secret) from your Azure portal. When users authorize connections, they can choose to use your custom integration instead. This gives your organization full control over OAuth permissions and policies.
**Setting a Default**: If you create multiple custom integrations, you can mark one as "default." This integration will be pre-selected (but not required) when users authorize new connections.
For now, we only support **Microsoft** as a provider. Support for Google, Slack, and other providers coming soon.
#### Adding a Custom Integration
#### How Integrations Work
Integrations control how users authenticate with external services (like Microsoft Outlook or Teams) when using toolkits.
**ARTAIOS's Default Integration**: If you don't configure a custom integration, ARTAIOS provides a pre-configured OAuth app that works immediately. When users authorize a toolkit connection, they'll use ARTAIOS's app by default.
**Custom Integration**: You can add your own OAuth app credentials (Client ID & Secret) from your Azure portal. When users authorize connections, they can choose to use your custom integration instead. This gives your organization full control over OAuth permissions and policies.
**Setting a Default**: If you create multiple custom integrations, you can mark one as "default." This integration will be pre-selected (but not required) when users authorize new connections.
For now, we only support **Microsoft** as a provider. Support for Google, Slack, and other providers coming soon.
#### Adding a Custom Integration
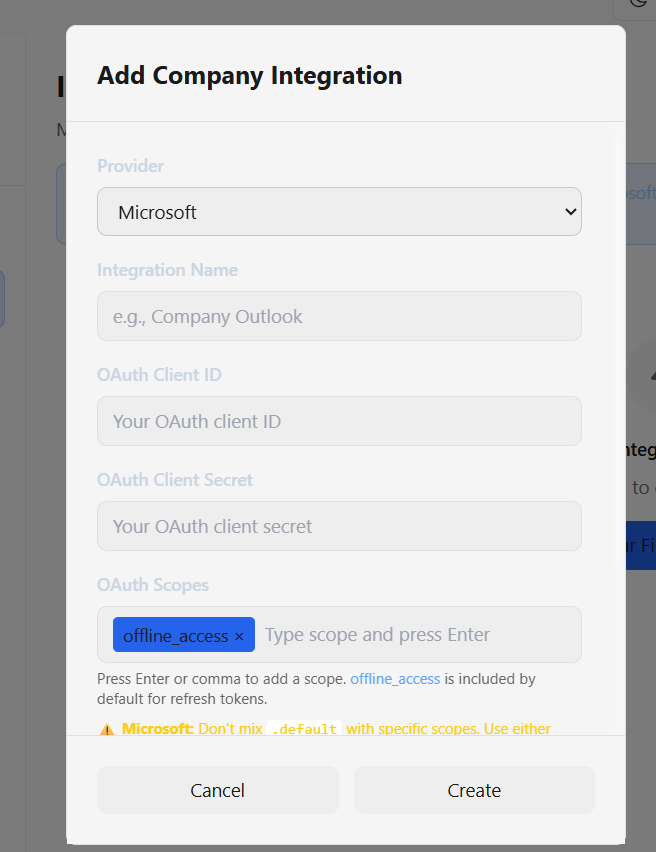 Choose **Microsoft** (only option for now)
Provide:
* **Integration Name**: e.g., "Company Outlook"
* **OAuth Client ID**: From your Azure app
* **OAuth Client Secret**: From your Azure app
* **OAuth Scopes**: Required permissions (e.g., `Mail.Read`, `Mail.Send`)
Your custom integration is now available for users to connect to
#### Setting a Default Integration
If you have multiple custom integrations for the same provider:
1. Find the integration in the list
2. Click **Set as Default**
3. This integration will be used by default for all new connections
#### When to Use Custom Integrations
* **Organization policies**: Your company requires using internal OAuth apps
* **Custom permissions**: You need specific Microsoft Graph scopes
* **Compliance**: Data must stay within your Azure tenant
Integrations configured here are used when creating **toolkit connections** in the Tools page. See [Tools - Toolkits](/documentation/studio/tools#toolkits) for how users authorize connections.
## Security Best Practices
**Principle of Least Privilege**: Only grant the minimum permissions needed
**Rotate Credentials**: Change API keys regularly
**Never commit secrets**: Don't put API keys in YAML files or git repositories
**Monitor Access**: Regularly review API key usage and integration logs
## Common Tasks
### Revoking an API Key
1. Go to Settings → API Keys
2. Find the key to revoke
3. Click the trash icon
4. Confirm deletion
Applications using this key will immediately stop working
## Troubleshooting
**"Unauthorized" errors**: Check if your API key has expired or been revoked
## What's Next?
Learn how to use your API keys
Build tools that use your integrations
Configure tools for your agents
Choose **Microsoft** (only option for now)
Provide:
* **Integration Name**: e.g., "Company Outlook"
* **OAuth Client ID**: From your Azure app
* **OAuth Client Secret**: From your Azure app
* **OAuth Scopes**: Required permissions (e.g., `Mail.Read`, `Mail.Send`)
Your custom integration is now available for users to connect to
#### Setting a Default Integration
If you have multiple custom integrations for the same provider:
1. Find the integration in the list
2. Click **Set as Default**
3. This integration will be used by default for all new connections
#### When to Use Custom Integrations
* **Organization policies**: Your company requires using internal OAuth apps
* **Custom permissions**: You need specific Microsoft Graph scopes
* **Compliance**: Data must stay within your Azure tenant
Integrations configured here are used when creating **toolkit connections** in the Tools page. See [Tools - Toolkits](/documentation/studio/tools#toolkits) for how users authorize connections.
## Security Best Practices
**Principle of Least Privilege**: Only grant the minimum permissions needed
**Rotate Credentials**: Change API keys regularly
**Never commit secrets**: Don't put API keys in YAML files or git repositories
**Monitor Access**: Regularly review API key usage and integration logs
## Common Tasks
### Revoking an API Key
1. Go to Settings → API Keys
2. Find the key to revoke
3. Click the trash icon
4. Confirm deletion
Applications using this key will immediately stop working
## Troubleshooting
**"Unauthorized" errors**: Check if your API key has expired or been revoked
## What's Next?
Learn how to use your API keys
Build tools that use your integrations
Configure tools for your agents